Choose-Your-Own-Adventure Formal Analysis:Updating a Classroom Staple for the Age of Remote Learning
Author: Anne Hunnell Chen, Yale University (anne.h.chen@yale.edu)
In the age of COVID-19, there’s no shortage of (justified) examinations and laments of the challenges and inadequacies of teaching online. Certainly, the wholesale transformation from face-to-face to online course delivery required of instructors in Spring 2020 due to the pandemic precluded many of our more intentional practices in course design and caused myriad difficulties. But as a veteran of pre-pandemic online teaching, I am certain that with some creativity and advanced planning, remote modalities can actually offer important silver linings to the art historical instructor. In particular, a well-designed, intentional rethinking of the classic formal analysis exercise has the potential to facilitate the inclusivity that we as instructors strive to foster.
We are heading into an academic year that will require, at the minimum, building into our courses the nimbleness to switch between delivery modalities at short notice. As such, the moment seems particularly opportune to share an updated formal-analysis exercise I have developed and tested in both the pre-pandemic and depths-of-pandemic virtual classrooms. This exercise offers broad flexibility as regards transformability for different chronologies and geographies, and the ability to adapt it for and toggle between in-person, virtual synchronous and virtual asynchronous modalities with relative ease.
When describing this assignment, I like to pitch it as a “Choose-Your-Own-Adventure-Meets-Formal-Analysis” Assignment (although, that description is probably a better reference point for instructor-peers than for our Gen Z students). Essentially, it uses experiential learning principles and the virtual environment to imbue a game-like logic into the exercise, which is, at base, aimed at training the skills of close-looking, close-reading, and critical thinking. Best of all, this update to the tried-and-true face-to-face formal analysis discussion presents the potential to mitigate to some extent the inhibitive impact of power dynamics on classroom participation.
Exercise Overview
Enough selling. In short, the key to this activity is to utilize graduated access (a.k.a. Adaptive Release in Blackboard, or Module Prerequisites/Requirements in Canvas) within your Learning Management System (LMS; Blackboard, Canvas, or the like) to create a scaffolded progression of tasks. Don’t worry, I include a step-by-step “how-to” at the end of this post.
The activity begins with a Prompt Object—an image of an artwork that I post in the LMS as the subject of the learning module. As Part 1 of the exercise—what I call the “Anticipate” section—I have the LMS require students to submit a brief free-writing worksheet (essentially a gently guided formal analysis; see an example of my Anticipate Worksheet here).
Submission of the formal analysis worksheet unlocks Part 2 of the activity—the “Observe” section.
With submission of Part 1, a link to a class-wide visual collaboration featuring the Prompt Object is revealed. In this virtual collaborative environment, students are each asked to contribute an agreed-upon number of substantive, self-generated observations, as well as responses to peer contributions either via video, audio, or textbox. In this group-collaboration, students can draw on the shared image to emphasize their observations.
Interacting with the “Observe” section then unlocks Part 3—the “Investigate” section. In this portion of the assignment students gain access to a folder of resources in the LMS (what I somewhat facetiously call the “Magic Folder”). This folder contains a pre-curated selection of three to six contextualizing resources that are somehow related to the Prompt Object. Mine usually contain some combination of comparanda images, floorplans, primary written sources, and secondary sources. Students are tasked to spend some time studying the resources in the Magic Folder, before composing and submitting Part 4, the “Reflect and Reconsider” part of the exercise.
For this final portion, students submit via the LMS a short (c. 600 words) written composition that reflects on their previous observations and incorporates new insights based on what they gleaned from the resources in the Magic Folder. Students are required to make reference to all of the Magic Folder resources in their Part 4 composition, reasoning out how they think each resource sheds light on the Prompt Object.
Why I Love This Assignment
Research has attested to the variety of ways student identities—including, among others, such potentially intersecting facets as gender, race, ethnicity, language, sexual orientation, and disability—together with the inherent authority-novice relationship built into university hierarchies, can shape patterns of classroom interaction.[1] Anyone who has stood in front of a classroom has experienced bouts of pulsating student silence, broken only by those few voices that feel safe (or privileged) enough to survive the indignity of being “wrong”. In my pre-pandemic hybrid classroom experience, however, this exercise brought out voices that otherwise stayed silent in the brick-and-mortar classroom.
In fact, in many ways, this assignment transforms for the virtual and university environment advice that our Museum Education colleagues have long advocated and applies the recommendations from general pedagogical experts to the specifics of the art historical classroom. Respected museum educator Rika Burnham and her many disciples have attested how the purposeful cultivation of a group-viewing environment where the authoritative curatorial voice is intentionally backgrounded—though selectively re-introduced to focus discussion—has facilitated engaging and memorable personal experiences with art objects, and significantly, spurred less-inhibited contributions from participants.[2] Similarly, psychological experts advise that “co-creating” the educational space together with participants, and fostering “authentic dialogue” among students and their instructor encourages a more dynamic—and inclusive—classroom setting.[3]
In my specific experience, I can attest to how transforming these guiding principles to the virtual university environment has fostered more playful, engaged, and inclusive conversation in the context of open-ended group-based object viewing. On the one hand, this assignment has helped to diminish (at least the impression of) the authority-novice dynamic, thus mentally freeing students to put forth their naïve or half-formed (but potentially insightful) ideas with less fear of embarrassment. At the very least, it allows that whatever embarrassment there is can be processed in private. Equally, it offers anxious, shy, or otherwise reticent students the chance to think through and draft their responses in a way that the immediacy of the face-to-face and virtual synchronous classroom often does not. No less significantly, such a configuration has afforded me as the instructor the space to slow down and craft individualized feedback that encourages hesitant—but valid—insights, and encouragingly guide less-relevant contributions, with the overall goal of productively shaping the group dynamic in future conversations.
Also important is the fact that this assignment also builds in an element of self-reflection—a principle for which the pedagogical pay-off is well-attested. This self-reflective component allows both students themselves and the instructor to recognize the ways in which a student’s thinking has matured or sharpened over the course of the exercise.
The How-To
If I’ve piqued your interest, at this point you’re probably wondering how this works in practice. I’ll devote the rest of this post to explaining and illustrating in replicable terms the steps I’ve taken to set up this sort of exercise. Below, I document my experience in Blackboard since that is the LMS where I have most recently integrated this sort of exercise. However, I do also call out some alternate resources for Canvas users since I know from past experience that Canvas provides similar functionality for the purposes of this activity.
A word of caution before jumping into the how-to: be aware that students can use reverse image search services to easily identify images that you have grabbed from the web, or to identify unique images of highly photographed objects (like the Mona Lisa). Of course, you as the instructor can be careful in selecting artworks on which to center such an exercise. However, regardless of how Google-proof you think your Prompt Object is, I recommend acknowledging the existence of the reverse image search shortcut from the beginning, and taking the time to explain to students that the purpose behind this exercise is less about arriving at the right, definitive identification of the artwork, and more about working logically through the process of asking questions about material culture and using visual evidence to support one’s assertions.
Getting Organized
To begin, I set up a section heading for exercises of this type (if you plan to do more than one in the course of the semester) on the main navigation panel of my course in the LMS (CYOA Modules=Choose Your Own Adventure Modules).

Within that section, I then create a new folder for each CYOA Module that I plan to assign throughout the course of the semester. For clarity, I label each Module’s folder with its number within the module sequence and a thematic title.

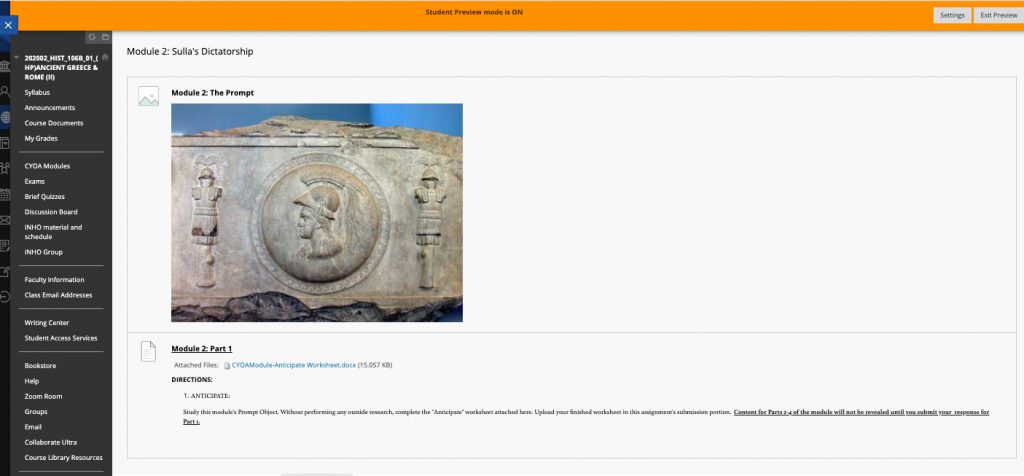
Inside each individual Module’s folder, students will progress through the same five sections: The Prompt; Part 1 “Anticipate”; Part 2 “Observe”; Part 3 “Investigate”; and Part 4 “Reflect and Reconsider”. However, upon entering the folder, students will only initially be able to see The Prompt and Part 1; we will be setting up Parts 2 through 4 to unlock as each successive portion is completed. Upon entering a Module’s folder, students will only see something like this (despite the existence of other locked content in the folder):
Setting up the Prompt Section and Part 1
To create The Prompt section, click on the Build Content tab, and select “Image”. From there you can upload the image you want to use as the subject of the Module. Next, to setup Part 1, click on the Assessments tab and select “Assignment”. Within the “Assignment” feature, write your directions, attach your “Anticipate” worksheet as a Word file (see the linked example above), then assign a point value and a due date. In this section my directions ask students to: Study this module’s Prompt Object. Without performing any outside research, complete the “Anticipate” worksheet attached here. Upload your finished worksheet in this assignment’s submission portion. Content for Parts 2-4 of the module will not be revealed until you submit your response for Part 1.
When students click this Part 1 “Assignment”, they are presented a screen that offers them a place to either cut-and-paste text, or upload a file:

Setting up Part 2
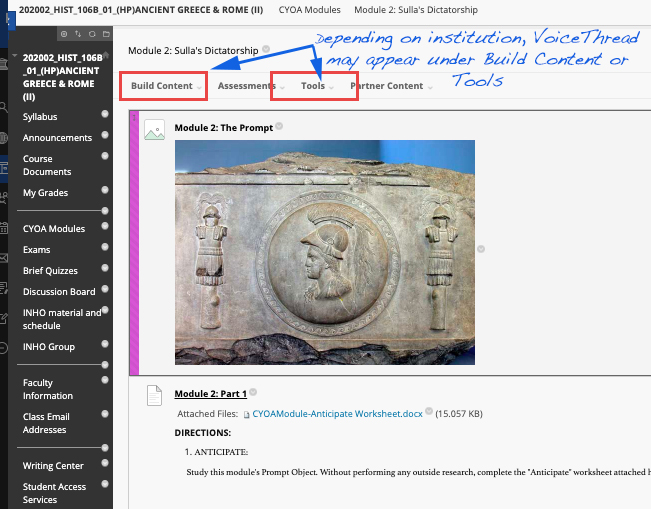
So far, so good. Setting up Part 2 is where we have to begin stipulating the graduated access. As you recall, Part 2 “Observe” asks students to participate in a collaborative formal analysis of the Prompt Object. In the past, I have used VoiceThread to facilitate this conversation since it allows students to upload videos or audio of themselves talking about the assigned image, all while marking up the image when relevant. I was skeptical that having students contribute to the conversation with videos or voice would really add much, but I admit I was surprised that this feature, in my experience at least, did positively contribute toward preserving something of the community aspect of the face-to-face classroom. Conveniently, if your institution provides access, VoiceThread is usually plugged right into the institution’s LMS. That means you can click the Build Content or Tools tab (different institutions may place it in one or the other) and select “VoiceThread” directly from the dropdown list to place Part 2 within the Module folder.
Selecting the VoiceThread option on Blackboard opens up a screen where you can embed instructions, assign a due date and enable grading. As a sample, my instructions for Part 2 read: Without performing any outside research, and using the formal analysis techniques we’ve discussed, contribute at least two substantive observations to the “group study” of the prompt object (available on VoiceThread), and respond to at least one observation generated by a peer. You may choose to submit your observations as audio, video, or text and use the “Doodle” feature when pointing out a specific feature of the Prompt Object so that it is clear what you are referring to. Directions for the Doodle feature are available here. Comments on the observations submitted by peers may be rendered as voice, video, or text box.
If you have not used VoiceThread before, this Blackboard tutorial (instructions for other Learning Management Systems available here) offers step-by-step directions on how to set up the VoiceThread space for an assignment. When I have used VoiceThread as a collaborative formal analysis space, I select “Individual VT” at the VoiceThread setup screen so that students navigate directly to the relevant “Observe” assignment from the LMS, then upload the still image of the Prompt Object.
Part 2 does not have to be done in VoiceThread. As a paid product, this tool is not available at all institutions. As a work-around, you might be able to take advantage of the free one-month trial (and $12/month thereafter for access for up to 50 users) of a product like MURAL as an alternative. MURAL does not allow users to embed video or audio comments, but does accomplish collaborative group interactions focused on visual material with chat features and image mark-up. Indeed, through the pandemic many instructors have become much more aware of the myriad, justified reasons students may not want or be able to record audio or video comments, so leveling the playing field and limiting group interactions to text-based commentary from users may actually be a more inclusive strategy. If you go with this option, you can add a directive to interact with a specific URL (ie. the group’s collaborative MURAL workspace) in the Module folder by clicking on the Build Content tab and selecting “weblink”.
Regardless of the strategy you use for facilitating Part 2, the key to having the Module progress as a structured exercise is to setup graduated access. In the steps that follow, I walk through how to designate graduated access in Blackboard, but Canvas also provides a similar kind of functionality with Module Prerequisites and Requirements.
After creating Part 2, click on the downward arrow next to the Part 2 link, and select “Adaptive Release” from the dropdown menu.

This will take you to an Adaptive Release setup options screen where you can specify the parameters that students must meet in order for Part 2 to become available to them. For Part 2, I choose the “Grade” option, and stipulate that students must have “At Least One Attempt” for Part 1 of the relevant Module (that is, they have submitted their Part 1 Anticipate Worksheet). You must select the prerequisite assignment (in this case Assignment Module x, Part 1) from the dropdown menu.

After clicking submit, if you have setup the Adaptive Release correctly, Part 2 will now appear with the following message in the instructor view:
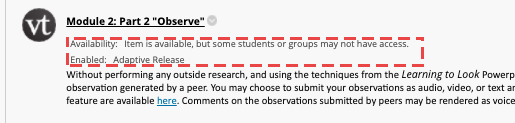
Now, students will only have Part 2 revealed to them upon submission of Part 1! The remainder of the Module’s setup is just a variation on the steps you took for setting up the previous components.
Setting up Part 3
For Part 3 “Investigate”—the Magic Folder portion—you’ll go back to the Module’s folder, click Build Content, and select “Folder” from the dropdown menu. On the folder setup page that appears, I embed instructions that say: Now that you have completed Parts 1-2, you’ve earned access to the Magic Folder! You are now asked to examine a series of additional resources provided inside. Each Part 3 “Investigate” folder will contain 3-6 additional resources of various types—primary and secondary source readings, maps, images, etc. Read and/or study all of the resources provided. Content for Part 4 of the module will not be revealed until you review each document from Part 3.
Click submit on the folder setup screen, and now you have the shell for Part 3.
Next, click into the folder you just created for Part 3, and add the contextualizing resources you have pre-curated related to this Module’s Prompt Object. In the example I’ve used to illustrate, the Prompt Object is a fragment of a sculptural base for a Roman monument. The resources I placed in the associated Magic Folder include another fragment from the same base, two brief primary sources related to the monument and its destruction, a coin reverse that shows the monument in its entirety, a secondary resource on the practice of intentional destruction of monuments in the Roman era, and a general historical overview of the relevant chronological era. This is the portion of the exercise where students are challenged to puzzle out how each of the resources in the folder relates to and sheds light on the Prompt Object. You can upload each of your resources using the Build Content tab inside the Magic Folder. For each resource in the Magic Folder, I generally provide tombstone information and sometimes add guiding questions to shape consideration of individual elements.

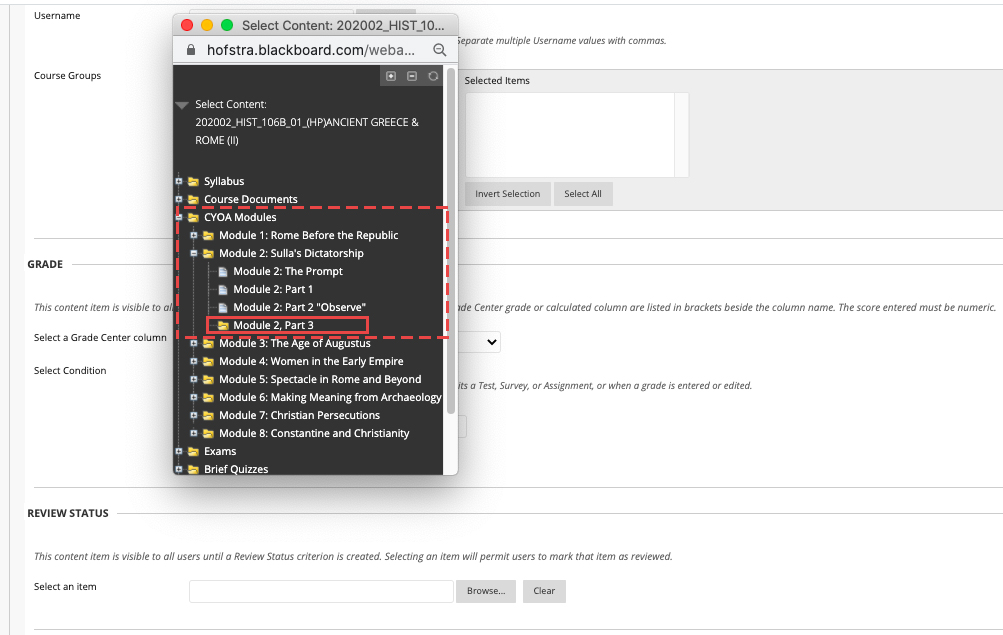
When you’re done adding resources, return to the Module folder. You’ll need to switch on “Adaptive Release” for the Part 3 folder you just filled with resources. Click on the downward arrow next to the Part 3 folder, and select “Adaptive Release”. This time, however, on the Adaptive Release setup screen you will be working with the Review Status component at the bottom of the setup window. Where it says “Select an Item”, click browse.
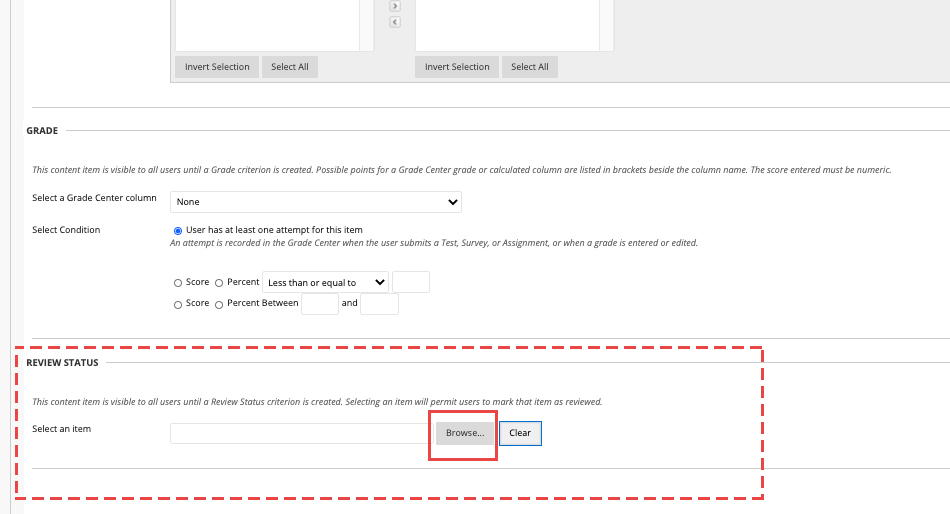
You will then be prompted with a mini pop-up that shows you the components from your unique Blackboard page’s master navigation pane (usually running down the left side of the screen). In this pop-up, locate your CYOA Modules master folder, then the folder for the current Module you are building, and select the “Part 2 Observe” element within this folder. (Don’t forget you can click the tiny +/- next to folders to reveal or collapse contents)

Click submit on the Adaptive Release setup screen (you might be prompted with the message “This selection will turn on Review for the selected item”; click OK). As above, the Part 3 folder should now appear with a notice that Adaptive Release is enabled and that while the content is Available, some students may not be able to see it yet. Students will not be able to see Part 3 until they have submitted Part 2.
Setting up Part 4
You’re almost done—just one more section to create. Similar to the setup for Part 1, click on the Assessments tab and select “Assignment” from the dropdown menu. Within the “Assignment” setup, write your instructions and assign a point value and a due date. In this section my directions ask students to: Return to the Prompt Object from the start of the Module. Reflect upon your “Anticipate” answer (Part 1) and the collaborative study of the Prompt Object (Part 2) and reconsider them in light of what you have gleaned from the resources provided in the “Investigate” section (Part 3). The following are some questions to guide your thinking: What is the Prompt Object and what is its significance for the unit? What information can this object provide about the ancient past, and is this information different from that provided by other types of resources? How do the prompt object and all of the assigned resources fit together? Why do you think the prompt object and the additional resources were assigned together? Compose a c. 600-word reflection that explicitly incorporates insights from ALL of the assigned resources from the Magic Folder–for clarity, please footnote or parenthetically indicate which resource you are drawing on and be sure to cite page and/or line numbers where relevant.
After submitting the setup for the Part 4 Assignment, configure the Adaptive Release. As you did when setting up Part 3’s Adaptive Release, set the prerequisite for Part 4 as a “Review Status”. This time, however, browse in the mini pop-up to select the Part 3 folder within the Module you are building.
Now you have configured the settings so that your students must review the resources in the Part 3 Magic Folder to gain access to Part 4.
You as instructor will surely have ideas about what kinds of connections students will find among the Prompt Object and the contextualizing resources, and you can even select resources that nudge students to attend to features of the Prompt Object that they might not have attuned to otherwise. But part of the fun of this exercise is seeing the insightful but unexpected connections students make and the realizations they come to in Part 4. While the instructor may have orchestrated some of those realizations and insights with the careful choice of Magic Folder contents, the scaffolded design of the Module allows every student mental space to practice applying the skills they are learning in class—close-looking, close-reading, and critical thinking—and hopefully, helps them to build a sense of self-accomplishment and proficiency.
Evaluation
In terms of evaluation, for Parts 1 and 2, I offer what is essentially a completion grade with lots of guiding feedback. I opt to place the most evaluative emphasis on Part 4. A sample of the rubric I use for grading Part 4 is available here.
In the age of the pandemic crisis and the inordinate demands on everyone’s time, I want to close with a couple of thoughts about workload for instructors with regard to this exercise. I have always assigned this sort of activity with small- to medium-sized classes (up to about 35 students). This is not to say that this exercise won’t work in larger groups, just that I have not tried it. The biggest drawback to doing so might be that in the form I have described above, and to be most effective in “meeting every student where they’re at”, this exercise relies on copious, substantive, individualized feedback that just may not be possible in massively enrolled classes, even in the best of circumstances. Perhaps adapting this exercise by enlisting peer-to-peer feedback might be useful for larger classes. Otherwise, one might think about running the exercise as described for Parts 1-3, and then conducting Part 4 as a virtual in-class discussion in Break-Out rooms.
I hope this post and the others in this series on online teaching will spur more creative thinking and sharing about how to utilize digital tools to help turn up the volume on the voices that are traditionally marginalized in our face-to-face art history classrooms. In the comments section below, I welcome your questions, inventive tweaks, and testimonies upon trying this activity!
[1] Tabitha Grier-Reed and Anne Williams-Wengerd, “Integrating Universal Design, Culturally Sustaining Practices, and Constructivism to Advance Inclusive Pedagogy in the Undergraduate Classroom.” Education Sciences 8, no. 4 (2018): 167; https://doi.org/10.3390/educsci8040167.
[2] Rika Burnham and Elliott Kai-Lee, 2011.“Gallery Teaching as Guided Interpretation,” in Teaching in the Art Museum: Interpretation as Experience, eds. R. Borunham and E. Kai-Lee (Los Angeles: J. Paul Getty Museum, 2016), 59-66.
[3] Grier-Reed and Williams-Wengerd, 2018.
++
Anne Hunnell Chen specializes in the art and archaeology of the globally connected Roman world. She received her Ph.D. from Columbia University, and spent time as a fellow in the Department of the Ancient Near East at the Metropolitan Museum of Art in New York. She has taught widely in cultural heritage contexts, museums, and in the university setting, including at Brown and Hofstra. Anne is currently a Postdoctoral Associate at Yale, where she teaches both graduate and undergraduate students and is at work integrating Dura Europos into the Linked Open Data ecosystem.
Anne thank you for your generous post. The timing is perfect. I teach art history and theory in Australia, and while NSW has managed the pandemic well, teaching has gone online. I have been wanting to rework their first assignment- an art review. Your suggestions definetely have merit in fostering collaboration and communication in what can feel like an isolated environment. Thank you again.
Laura
What a wonderful assignment! I’m wondering if anyone has been able to set this up in Moodle (we use Course Connect at my college).
Thanks!